
It has been some time because I have been extremely busy as you can see. I am not much for posting DIY stuff as there is already a ton of stuff on line. But in this case I thought you all could use one more, or at least some cool pictures of how we redid our kitchen cabinets.
Not everyone can afford to just go out and replace everything in their kitchen. With a little blood sweat and tears you can do it yourself.


Supply list:
1/4″ plywood (finished Plywood)
Your favorite pain color (semi-gloss)
1/2-3/4″ Brad Nails (depends on thickness of your cabinet doors)
Sand Paper 80 grit and 200 grit ( a rough and a smooth grit)
Air Compressor
wood filler
Putty knife
Paint Roller
Tools:
Skill Saw saw
Table Saw
Brad Nailer
Air Compressor
I am aware that not everyone will have some of these tools, especially a table saw. This is where you have to get to know your neighbors and friends better so that you can barrow or rent them.
- Don’t get excited and take off all the doors and start to quickly, as I wanted to do. You MUST number each one so that you can place them exactly back from where they came. This is extremely important. And you can take it a step more by bagging the hardware for each back to keep the same hardware as well. This will make everything even smoother.
- SAND, SAND, SAND!
- Cut your trim. I cut ours in 2″ strips. I only put them on the doors because the drawers where to small, and I did not want to confuse it with a different size strip for them.
- Using a brad nailer and air compressor (this is where you need to be a perfectionist) cut and measure everything to fit the edges of each door. Some people use glue. I found this is not necessary and just takes more time. With all the sanding, you will not want to waste time. The brads work great without the glue.
- After completing all the trim you need to use wood filler to cover all the brads and any spaces that might be showing. Some people add filler to between trim and door, I did not need to do this because it sat flush. Note: If you have curved doors on the outside you may want to sand your trim to look better with the doors or if you like me, I was ok with the look and left it as is. It looked fine with our slightly curved doors.
- PAINT, then sand, then repaint, then Sand, then Paint. This all helps keep a smooth finish. Also remember this is your kitchen. You want it to be easy to clean with lots of layers for added strength. I think you need at least 3 coats of paint. Also, clean the dust off before adding a new coat of paint. You want to keep as smooth a surface as possible. We used a roller to apply paint because it helps keep that smooth finish.
- Also paint and sand as above, the drawers and cabinets. Yes, you can that too, because you want that smooth as well. 3 Coats and you will be glad later that you did.
- Breathe! You are almost done. And you saved a billion dollars…or close to it.
- Put everything back into its place. IMPORTANT, be sure not to over tighten anything when replacing. You will have to adjust and re-adjust as you go along.
- Celebrate with a glass of wine and dancing!
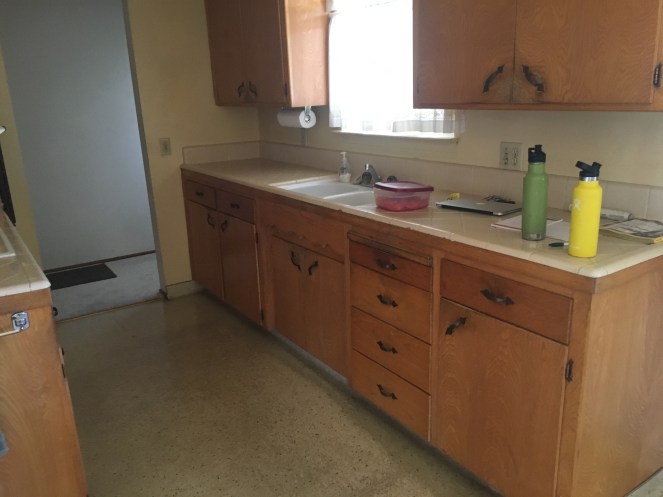
How about some pictures for this project?


This proust took about a week for use because we have life that happens as well. I have read some people do this in a weekend but that just was not possible with out life of Farm, Family and Farm. I am raising kids, the farm and rebuilding another house at the same time. This was a hectic time to say the least. Point is, don’t feel bad if you don’t live up to the expectations of other blogs.


AND then we came along and added new appliances because the existing appliances where from the 1960’s. We also put in some in expensive laminate flooring over the existing linoleum and splurged on a granite counter top. This brightened the whole kitchen. I have since gone back through and brought everything into the kitchen which added even more color…Because I love me some color.


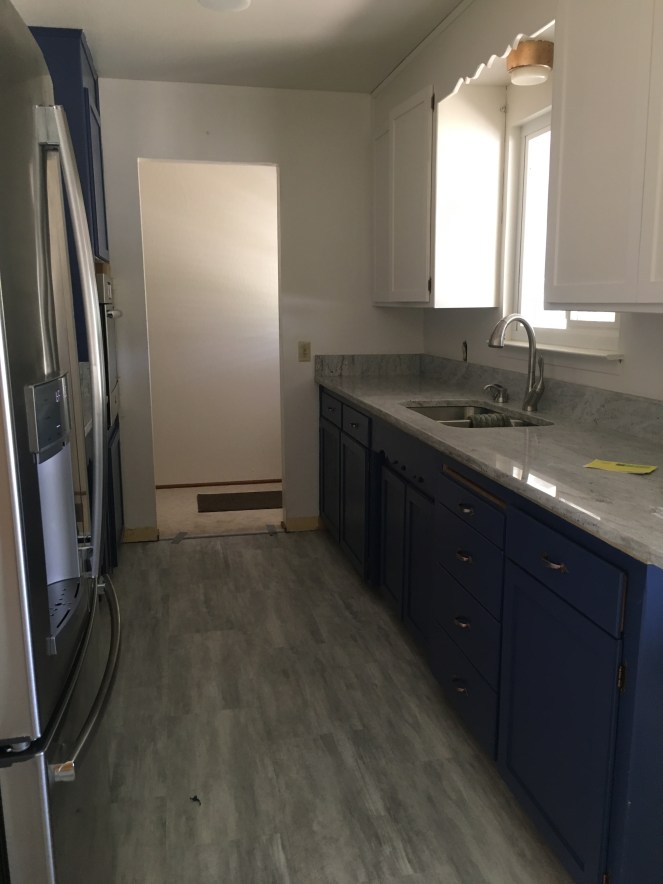
Total cost includes that of the wood, paint, sandpaper, putty. About a whopping $200 for a brand new kitchen refacing. (does not include floor and counter top) This left us some wiggle room to get a nice stove and fridge.
How this inspires you. If you want something bad enough, sometimes you have to DIY
