
There is something emotional for me on planting day….The moment I finally put those plants in the ground. And it is especially special this year because we are planting about 90 percent of our plants from seed as opposed to buying the plants from a nursery. The Sun has been shining strong for several weeks now and the soil has heated up. The plants in my greenhouse are looking strong enough to go it a lone..Sort of.

The first step in this growing season happened when we covered those seeds with soil.

Through wind and rain and transplanting them into larger pots they mostly survived, other then one greenhouse mishap when I forgot to open the vents on our fist hot day after the rain; I lost a few that day. But the rest of the plants made it to planting day where I take them from their protective area and place them in a prepared garden just waiting to give them some love.
First step with preparing the garden was actually making the plan. I use Mother Earth Garden Planner to draw mine up and that usually happens in January. I also add in an irrigation plan. For me this is extremely helpful as we have a larger size garden and I need to know what connects with what, as well as place veggies that use more water together like melons and cucumbers.
Below is a sample of our garden plan using this program: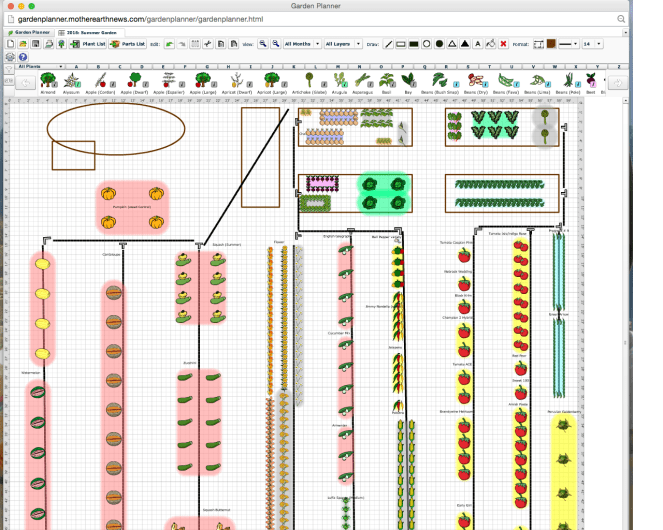
I then use this irrigation plan to lay out all my hose. I like to do this before the plants are in the ground that way all I have to do is turn the water on when the time is right, no rush hand watering, not 45 tomato plants!
Next I had to use my plan to prepare the place these plants would be. For example, I like to raise my tomatoes up a bit. They have shallow roots and don’t like compaction. Putting them on a raised bed stops the compaction from around the roots. Raised beds for tomatoes also helps me during planting as I am able to pack a lot of dirt around the stem to give this tomato a great start.

One misconception while planting tomatoes is the actual putting the plant in the ground part. It helps the tomato if you take off the bottom straggler leaves and burry that stem as deep in the ground as possible. This is called the deep planting method and allows for more solid roots to take hold where those leaves where growing. If you look close there are fibrous hairs that also turn into roots to give that tomato plant a nice strong start. I don’t recommend this for most other plants, but give it a shot with tomatoes. Follow this link planting tomatoes for a better explanation and a cool picture from Fred Gonsowski Garden Home.
This was also an opportunity to show my little side kick how to plant. Yes, it slows the process down a bit, but there is nothing like teaching gardening to a two year old. I have to train myself to stop yelling stop or no…instead, I just watch as he throws dirt where he thinks it should go, and toddler handles the plants a bit much. This is why I have a few extra plants laying around. It is all part of the learning process….For the both of us.


Next in the ground will be peppers and cucumbers followed by melons and more seeds! We will be putting in an experimental flower row. Can’t wait to see how pretty that might turn out. I will be sure to post it.
I like to plant both my cucumbers and cantaloupe on a trellis. This keeps them from getting eaten by those darn gophers and easier for me to pick. It also allows me to plant them closer together.

After the ground has been prepared for the plants one of the most important things I do is lay a weed barrier of some sort. We planted on a cloudy day which is a perfect day for planting new plants because it helps them connect to the soil better without drying out and shriveling under a hot sun. But, as soon as that sun does come out the weeds will grow like…weeds. For this I do two things: First I lay a weed barrier. This year I had a bunch of cardboard laying around so I laid that that down, then when I used that all up I put actual weed cloth down. I also put down some old hay spreading it in between plants and rows. Last year I had very little weeding and used no chemicals of course. I am even able to reuse some of that weed cloth from last year. I try to be as sustainable or “green” as possible. Of course, you can use whatever you have…newspaper, grass clippings, etc.

The garden is now close to being finished with only the winter squash and melons to plant. I am excited to try a few new things this year…Including aquaymanto or Peruvian goldenberry. I learned about Aguaymanto on my trip to Peru. This fruit is worth it and I will also give updates on how well it grows. I started it from seed and look forward to see how it does in out soil. The seed comes from Redwood Seed company located in N. California, so thanks to them I get to experiment with this lovely little fruit which you can read more about through the link above.

Indeed, we got a lot done that first day, but of course a garden does not take care of itself, and neither does an orchard full of walnuts….A farmer NEVER rests. Happy planting season everyone!
